

Many users asked this many times, “How can I create custom forms and reports using widgets”. Depending on how the question is perceived, the answer is, “You can make your customized bar chart or pie chart based on the data with easy-to-use software tools.
However, you can show arbitrary HTML in a widget that embeds complete reports. This blog will discuss using Widgets to create custom forms and reports in your Zoho Creator Application.
But, before that, let’s cover some basic information about a complete and fully customizable enterprise software platform that helps create custom forms and reports.
What Are Widgets?
A widget is an element of a graphical user interface that helps to easily interact with the operating system and get all information in one place. Widgets can be embedded into the website and work with real-time website data. It can be personalized to respond to website identity, for instance, countdowns, website visitors, clocks, etc.
Additionally, widgets assist you in extending the capabilities of your development applications and performing tasks beyond the scope with built-in functions. With widgets, you can create interactive applications that provide a richer user experience and reassess how your app interacts with users.
Widgets can help you to lessen the workload of creating dynamic and interactive forms. It allows you to make changes on your forms that you wouldn’t think of as usually possible. Let’s make things a lot easier using widgets now!
How Can You Create Custom Widget?
You can easily integrate the widget with your Creator forms and create custom designs for forms and reports with HTML, CSS, and JavaScript. Although, it can be used to create and design forms and maintain consistency in the UI for customers building websites.
It will collect information which can be sent directly to the user’s inbox and trigger a workflow. First, the widget will trigger the creation of an instant app or website using custom code, including HTML, Javascript, and CSS. For the last part of the widget, you need to set up design input options.
Create The Zoho Creator Widget
Zoho Creator brings many features that help to consolidate your applications together. However, there can arise instances where you cannot find the right solutions. Widgets can assist you in resolving such minor setbacks.
You can create a feature, configure Zoho Creator Widget and add it to your website to attain the kind of usability you want. For example, you are an automobile dealer with an application to gather monthly sales-related data. The dashboards cover your details and show individual performance scores with customer feedback.
You need to configure the form as a widget on your page using JavaScript, HTLM, and CSS to create custom forms. Besides, you can use Zoho Creator API to edit, delete and update data.
To create Zoho Creator Widget, you must install the Command Lind Interface (CLI) on your devices. CLI helps send commands to a software program to interact with it.
Let’s install CLI and create your first widget with us!
What Are The Methods Used To Create Custom Widgets With Zoho Creator
Let’s look at essential methods used to create custom widgets with Zoho Creator!
HTML & CSS
HTML & CSS will help to design custom forms and reports(tables).
JavaScript
With JavaScript, you can quickly implement show/hide components and data-oriented backend functionality. For example, with the widget, you can effectively send data from an HTML table to a custom form.
JS API
JS API will help to push, pull, delete and update your data within Zoho Creator.
All methods mentioned above help to create a custom form and table to view and update data easily. Design a custom form and report by the below steps!
- Design the custom contact using HTML and CSS code.
- When a user clicks on the + button, use javascript code to present the form.
- Use JS API to update data to the Creator database. After user data is added to the Creator database, you can use JavaScript again to refresh the form.
- Create the custom report using HTML.
- Use CSS to add style and design to your table, including colours, font size, text alignments, etc.
- Use JavaScript code to indicate and refresh the table.
So let’s get started!
Step 1: Design the custom contact form using HTML and CSS code.
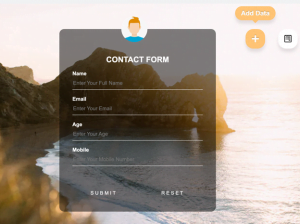
Step 2: Use the JavaScript code to show the form on click of the + button.
Step 3: Use the JS API to add data to the Creator DB once the user enters data in the fields. Then, we’ll use JavaScript again to refresh the form once the data is added to the Creator database.
Step 4: Create the custom table (report) using HTML, as shown in the image below.
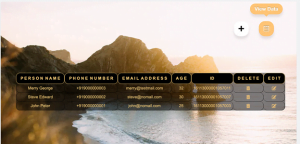
Step 5: Use CSS to add style to your table, like colours, font properties, text alignments, etc.
Step 6: Use the JavaScript below to show and refresh the table.
Wouldn’t it be helpful to create a custom form and report with Zoho Creator Widget? So let’s connect with KG CRM SOLUTIONS and talk about your queries regarding this blog!
Feel free to ask anything; We’d be happy to answer you and clear your queries!
Stay Safe, and have a Good Day 🙂


